Tuesday, August 18, 2009

A Fall Block Exchange

Here they are finally. I finished all my blocks to fill in and enhance the look of fall and those magnificent colors. The captions on the pictures show credit for the blocks. More to come as I add setting triangles and borders and other items to make a Harvest Moon fall quilt.

Saturday, August 15, 2009

1930's Fabrics


I participated in a block exchange this year and these are the blocks I received. I added two of my own and set them according to color. I took a charm pack of 30's fabrics and made blender blocks and set them all on point. The next step is to add sashing between all the blocks as well as setting triangles. Stay tuned for further details. . . Just thought you'd like to see one of my UFOs. (UnFinishedObjects)

Tuesday, August 11, 2009

Charming Log Cabin


This is an example of what I like to do with my computerized quilting machine. I loved this fabric and quickly digitized some of the flora in the large print! I made it into an E2E and it looks elegant. Tell me what you think.

Sunday, August 9, 2009

Wholecloth - The First

This is not a quilt for show. I learned a lot by making this one and I'm already designing the next one. A Wholecloth quilt seems easy--no piecing! Just take a couple of yards of very wide fabric for the top and the bottom, insert batting, and quilt it. Right? NOOoooooooo! You must plan how you are going to quilt it. You start at the top and quilt down to the bottom, or start in the middle and quilt out to the sides, then roll back to the top, then to the bottom. You quilt the top, the center medallion, then the bottom, leaving the center sides for last so you can distribute the designs evenly in the middle. There's more than one way to quilt a Wholecloth! If you've never done one, just jump in and try it. You can't go wrong! This one needs more quilting in the bubble spots, but I'm calling it done. I love the Battenburg Lace around the edges. I pinned the lace sleeve caps to the top of the quilt, stitched in the outer wide lace, then trimmed top excess. I trimmed away the excess quilt from underneath also. The batting edge shows, but not from the top. It isn't a very pretty finishing underneath, but it's lovely from the front. Be sure to quilt evenly all over. You can see from my pictures what happens after it's washed and dried--lots of empty spaces that need quilting. For today, it's my first. Remember Kindergarten? We all started somewhere.


Wholecloth

Saturday, August 8, 2009

Ever wanted to make a quilt in a hurry?

I attempted to make a quick quilt today. Maybe it was the pattern I chose, or maybe I just didn't have the right fabrics, or it could be I'm not the agile young sewer I used to be, but it took me a couple of hours to produce just the top. I get sidetracked very easily and other household duties call on Saturday. Besides I have been working on a quilt for a wedding present and it's not finished yet.

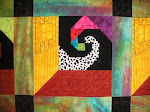
Here are some pictures of what I did. I started with 9 fat quarters, trimmed them to 17 inch squares, the largest square I could get out of them. Cut the squares into four smaller squares that turned out to be 8.5 inches. I made four very large nine-patch blocks. Cut them into quaters which yields sixteen 12 1/4 inch blocks. I chose to use only twelve so that it would fit the width of fabric for backing. I cut the leftovers into 2 3/4 inch strips and used them for a scrappy border. I had to cut two more strips out of another fat quarter.

It's pretty wild because I just dipped into my stash and did the best I could. Next week I'll put it on the machine and quilt it. More pictures later. . .


I'm editing here. I finally finished this project. It took me five days to fit it in. Total time was probably under 4 hours. If I had left enough backing, I would have just turned it to the front for binding. I spent a while cutting, piecing, pressing/folding, and attaching the binding with my DSM. For a quick kid's quilt, it's much sturdier and will last longer than hand finishing. Quicker too!

If you have the need for a quick project, this would be a good one. You could do it in a day with no problem, and probably half a day if everything is at hand. More pictures at Webshots.


Quickie Quilt

Friday, August 7, 2009

Lazy Days of August Shop Hop


With six shops to visit we started in Eugene at Piece By Piece Quilt Shop, and worked our way up the Valley ending at the Pine Needle in Lake Oswego. Each shop had a mystery item to find, a sort of fruit either real, picture, fabric, etc. After finding the item, we received a stamp in our passport and a pattern for a block in the Indian Summer quilt, designed by Karen Stephens at the Speckled Hen Quilt Shop in Wilsonville. Thimbles and Thread in Junction City had a darling fall version of the quilt on display. Greenbaums in Salem made a table runner out of the nine-patch and snowball blocks, and Karen's completed quilt hung at the Speckled Hen. The Pine Needle displayed a pillow made from the center block. Grandma's Attic in Dallas gave us the friendship block in a plastic pattern bag to keep all the pieces. The quilt consists of five different blocks and Karen gave the sheet with assembly instructions. I noticed that Piece by Piece had colored patterns to give out; all the rest are in black and white. That means we have to come up with our own colorway. I don't know when I'll get to this one. It is very simple, great for beginners, and it shouldn't take very long to put together. The weather was nice and cool, a little sprinkle of rain early this morning on the way to Eugene, but the rest of the day was cloudy. Traffic was a mess in Portland from 4:00 on. We skirted around and after taking cousin Patty home, we arrived home in time to go for a bike ride around Dundee. After riding in the car all day, only to get out six times, it felt good to get a little exercise before retiring to the sewing room for the evening.
I am Bonnie Russell, owner and quilter, and my business is making beautiful quilts and making quilts beautiful. NABQC came about as a partnership between the love of sewing and hazelnut farming. That's how the name was chosen. My husband, Fred, is the nut farmer, and I do the sewing using many bolts of fabulous fabric. My studio is located in Dundee, Oregon, the beautiful Willamette Valley, in the center of a hazelnut orchard. Experience came with 42 years of dress making, 40 years of marriage to my wonderful, loving, supportive husband (34 years of nut farming), 25 years of raising three daughters, and now we have seven grandchildren to mentor in Future Quilters of America!

With a Statler Stitcher and Gammill Optimum Plus longarm quilting machine, a 14 foot table, and the drawing program AutoSketch, no project is too big or too small. Anything from hand guided meandering to custom digitized designs can be applied to a project to complete that labor of love.


This blog is to temporarily serve as a source of information until a website is produced. It contains pricing, products, helpful hints, pictures, inspirations, and who knows what else will show up. Thank you for reading and I hope you will find it helpful.

Tale of a Dog

Followers